WRITING
Zero to TestFlight: The Complete Path to Shipping an iPhone App Solo

In two weeks I built nine iPhone apps; eight of them went out on TestFlight (Apple's official beta channel — install it and other people can use your app before it ships).
This is not a retrospective. It's a tutorial: five steps in the exact order you'd walk them from zero, and for each step only three things — what to do, how to know it worked, and where the trap is. When you finish, you should be able to walk the path yourself — or at least know, at every step, what you're waiting for and what not to trust.
One reassurance and one warning up front. The reassurance: writing code is the easiest part of this whole chain — my smallest app is 367 lines. The warning: every link in this chain tends to half-succeed quietly — no error, but nothing happened either.
The hard part isn't writing code. It's proving you are you — and knowing, at every step, whether it actually worked.
1. Step 0: Decide whether this should be an app at all
What to do: before touching anything, run the idea past one veto rule:
If you just want to glance at something on your phone, and you have a connection — that's a bookmark, not an app.
There are only four things a phone app can do that a web page cannot: work offline, use hardware like the camera, live on the home-screen widget or lock screen, and write data back using the phone's own capabilities (photos, Face ID).
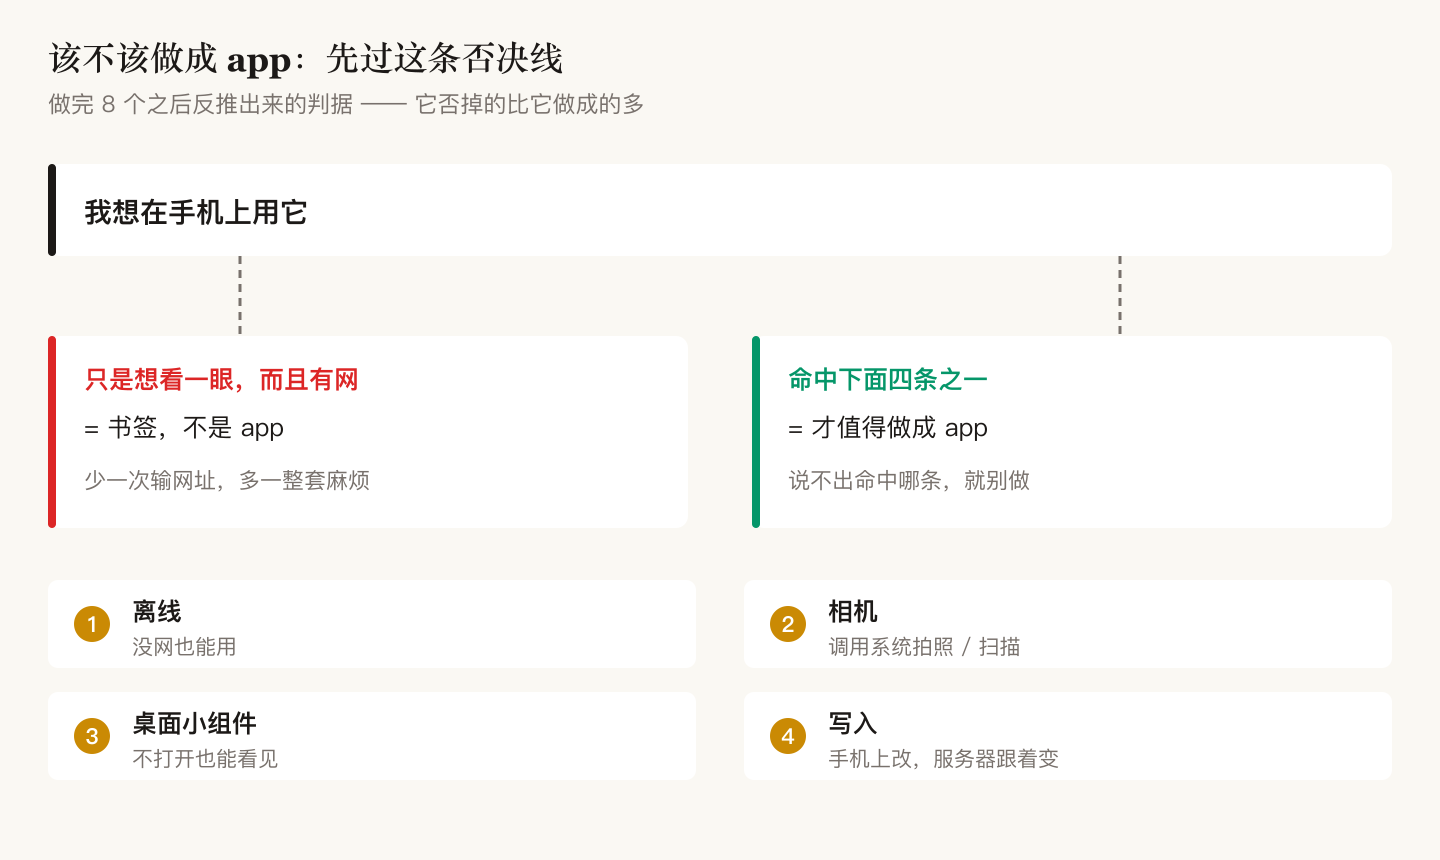
How to know it worked: you can name, in one breath, which of the four reasons your idea hits. If you can't, save the URL to your home screen — five seconds, zero cost, same result.
The trap: I nearly fell in once myself. There's a page I open every morning to see what to do today, and my instinct said "an app would be so convenient." Stop and ask: what would the app add over opening that page in the browser? Nothing at all — one saved URL entry, in exchange for every bit of trouble in the five steps below.
2. Step 1: Register — and make the irreversible decision first
Choose the account before you touch anything
Apple developer identity comes in two tiers:
| Tier | Install on your own phone | Give to others | Validity | Cost |
|---|---|---|---|---|
| Free | ✅ | ❌ | 7 days — then the app simply won't open | 0 |
| Paid | ✅ | ✅ TestFlight | 1 year | ¥688/yr (China region; non-refundable) |
The free tier is fine for testing the waters. But there's a rule almost no tutorial writes down: every app has a globally unique identifier, and an identifier ever signed under the free tier belongs to that Apple account permanently. Nobody can delete it.
My actual cost: I tried three apps on the free tier of my old account, then — once convinced — bought the paid membership under a newly registered Apple account. The two identifiers signed under the old account were gone for good: uploads returned "identifier not available," one app had to be renamed, the other I gave up distributing.
So step zero of step one is: decide which Apple account the paid membership will live under, then use only that account from start to finish. It's the one irreversible decision in the whole chain, and it happens before you realize you're making a decision.
Pay and wait
What to do: developer.apple.com → Enroll, choose the individual tier (no company paperwork needed), pay ¥688.
How to know it worked: the "welcome aboard" email arrives. The page says "up to 48 hours"; mine took about 8 (paid at 7 a.m., approved by 3 p.m.). Don't schedule around 48 hours, and don't count on 8. The page showing "Pending" the whole time is normal — no need to retry.
Immediately generate an API key — it decides whether anything can run unattended
Once the paid tier clears, don't rush to create an app. First go to the back office (App Store Connect → Users and Access → Integrations) and generate an API key: one small file plus two identifier strings. Its job is to make "upload an app" never again require a human sitting there typing passwords and verification codes.
I was blocked for two full days precisely because I skipped this at first:
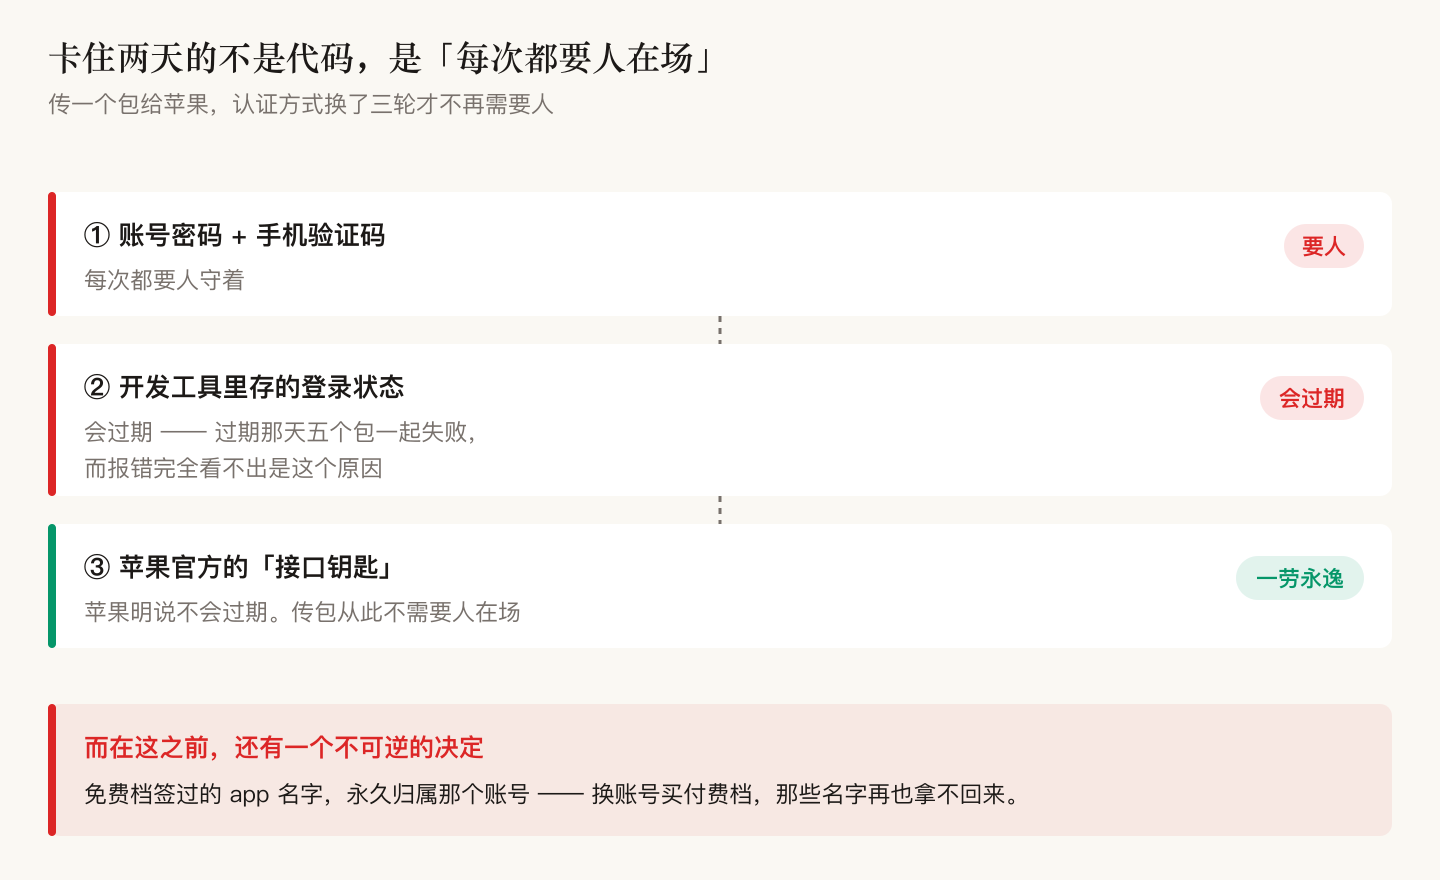
How to know it worked: the private key file is in your hands and the two identifier strings are stored somewhere safe.
The trap: Apple lets you download that private key file exactly once. Save it on the spot; there is no "later."
3. Step 2: The first app — get one screen running first
The environment has exactly one requirement
Install Xcode (Apple's official development tool, free). The one trap: Xcode's version must not be older than your phone's system version. When your phone updates past it, the error message will never say "upgrade Xcode" — you just get an inscrutable connection error.
How to know it worked: with the phone plugged in, it shows up in Xcode's device list with no yellow warning icon.
Requirements don't need a document — point at something that exists
Nine apps, and I never wrote a requirements document. I pulled out every sentence I typed — 149 of them, median 34 characters:
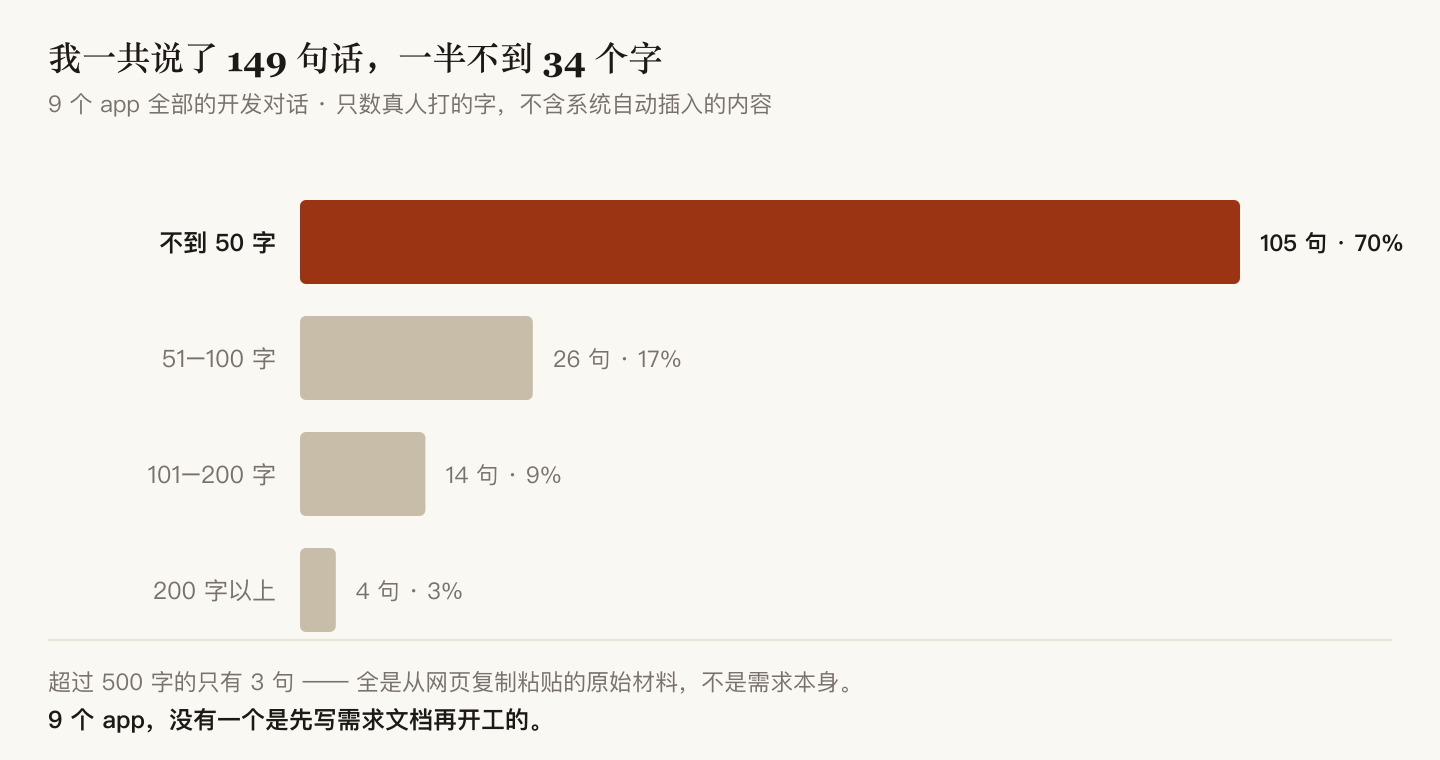
The most effective ask is to point at something that already exists: "this web page / this program — make it an app." An existing thing carries the three hardest-to-explain pieces for free: where the data comes from, how the logic works, and what the terms mean. Conversely, if an idea can only be described in prose with nothing to point at, it's probably not ready to build.
(This holds equally for working with an AI and for assigning work to yourself.)
The iron rule: until you've seen screen one with your own eyes, don't write screen two
What to do: build one screen only, run it in the simulator (the virtual phone bundled with Xcode), see it, then write the next.
Why: how screens connect — bottom tabs? tap into a list? — is the app's skeleton. Get the skeleton wrong and discover it at screen five, and all five get reworked. I made exactly this mistake, word for word, once.
How to know it worked: you saw that screen in the simulator. Not "it compiled" — compiling only proves you didn't typo.
A word on size, so you dare to start
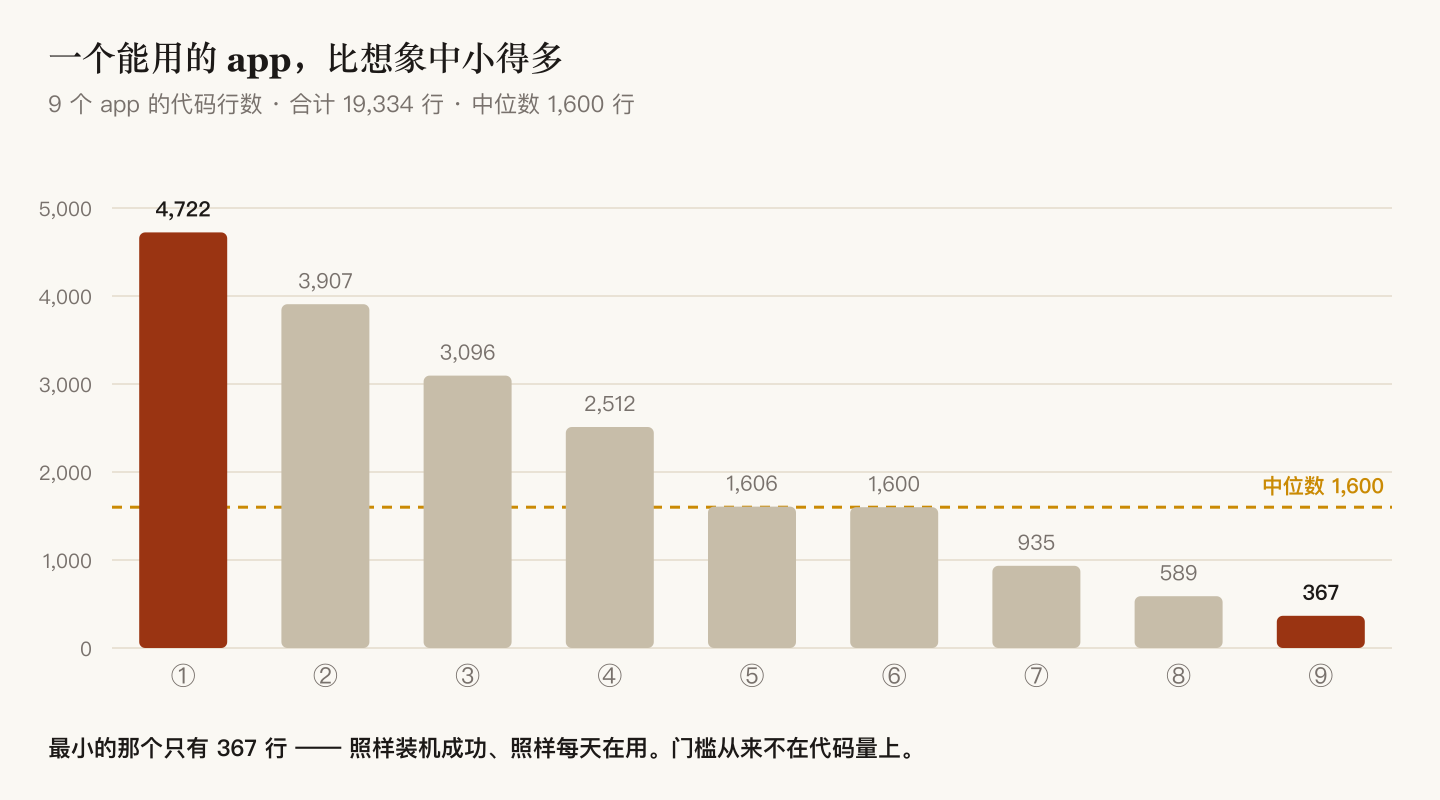
All nine apps: 124 source files, 19,334 lines — per app, a median of 11 files and 1,600 lines. The smallest is 367 lines, installed and used daily.
4. Step 3: Install on a real phone — from here on, "no error" lies
What to do: connect the phone (cable, or same Wi-Fi), select it in Xcode, hit Run. After the first install the phone will refuse to open the app until you go to Settings → General → VPN & Device Management and manually trust your developer certificate — that's the normal flow, not a failure.
How to know it worked: open the app on the phone and tap into its second screen. The icon appearing on the home screen doesn't count — an app with a broken signature still shows its icon; it just closes on tap.
The trap: from this step on, commands and tools will "lie." I collected four pairs of what I assumed vs. what was true:
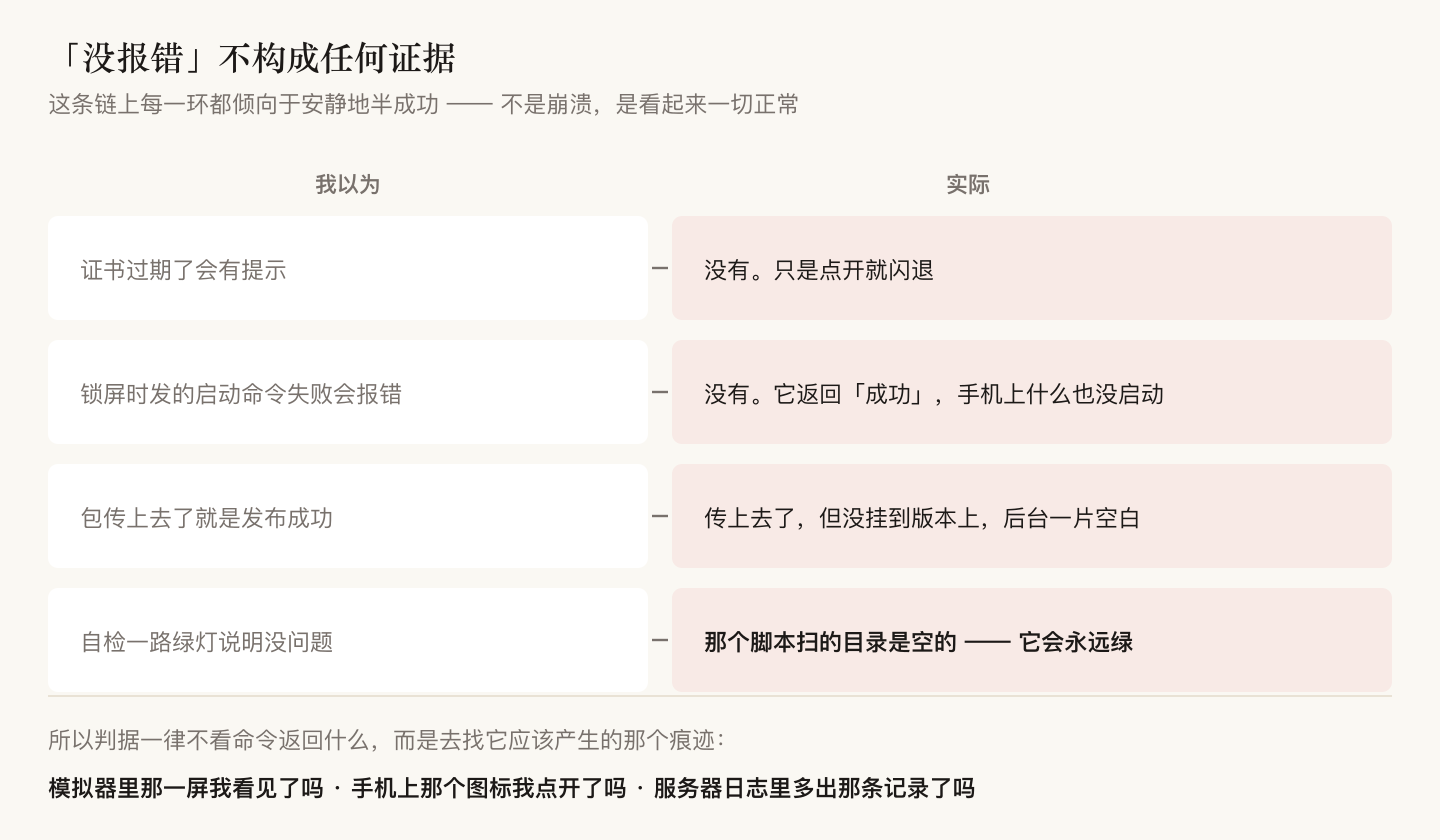
Two of the four are about launching: with the phone locked, the launch command returns "success" while nothing runs; with the app already open, launching again also returns "success" while the new launch parameters never make it in.
This step taught me the most valuable habit on the whole chain: to judge whether something worked, don't listen to what the command says — go find the trace it should have left. If the app really launched, the server's log should show one new request from that phone. Without that log line, no number of printed ✅ marks counts.
5. Step 4: Connect the data — three shapes, an order of magnitude apart
Where does the app's data come from? There are exactly three shapes, and the choice decides half of your remaining work. My nine happen to cover all three:
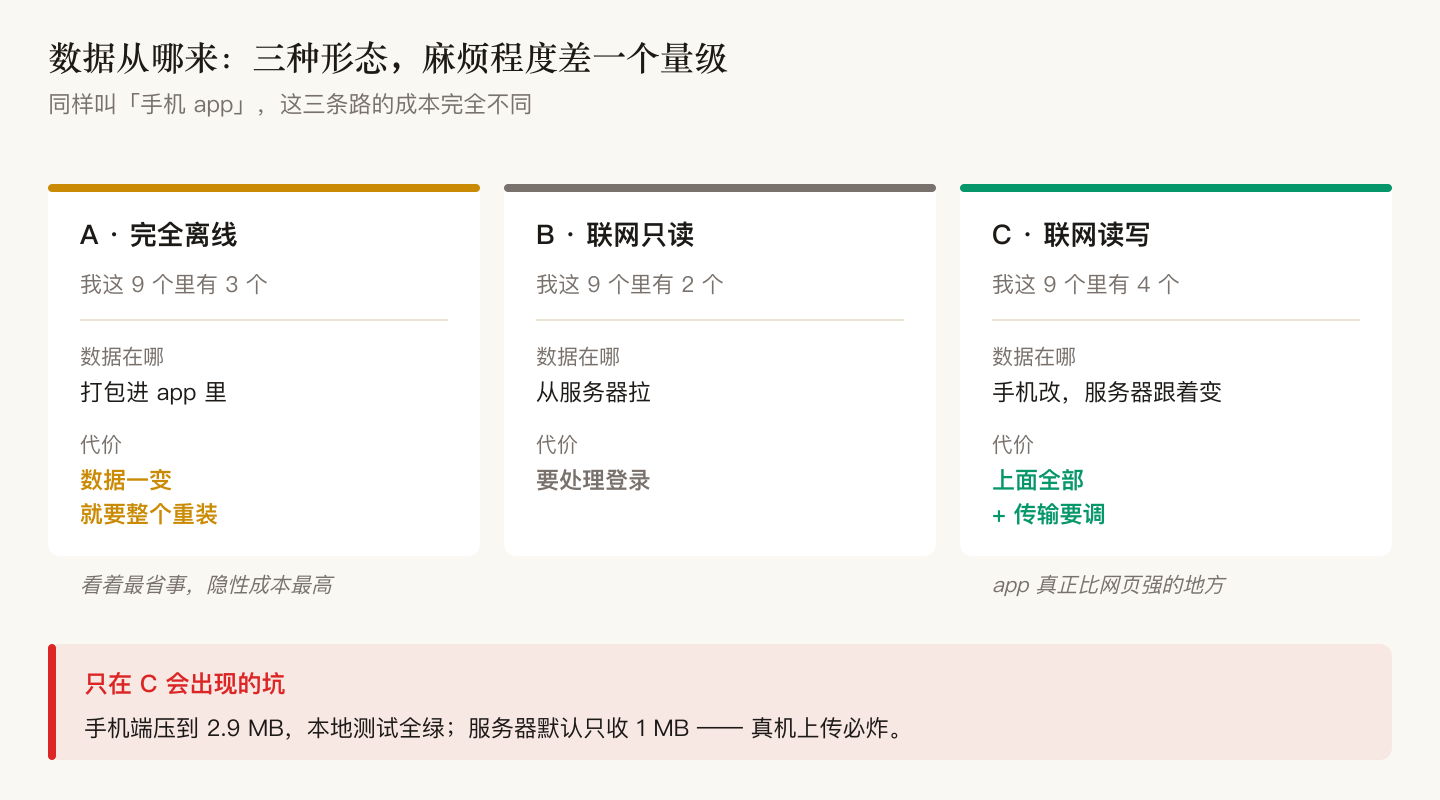
How to choose:
- A · Fully offline: data is generated on the computer and packed into the install bundle. Looks easiest — no network, no login — but every data change means reinstalling the app. Only fits content that changes rarely (archives, question banks).
- B · Networked read-only: the phone pulls from your server; data stays fresh; the price is handling login.
- C · Networked read-write: the phone writes back to the server. This is where an app genuinely beats a web page (the "write back" reason from step 0) — and it's also the deepest pit.
The trap you will hit in shape C, served verbatim: one app photographs a full page and uploads it to the server. I'd already compressed the image to 2.9 MB on the phone, and every local test was green. On a real device against the real server, it failed every single time. The reason: the server by default accepts uploads of at most 1 MB and rejects anything bigger — and the local test environment has no such limit, so locally it's green forever.
How to know it worked: before shipping a shape-C app, send the largest realistic payload from a real phone to the real server once. The simulator and a local backend prove nothing here.
6. Step 5: TestFlight — and the acceptance checklist for the whole chain
What to do — three things:
- Create the app record in the back office (App Store Connect → Apps → New App). This is the only screen in the whole chain a human must click; it cannot be automated. Note that app names are also globally unique — common English words are long taken; a Chinese name went through on the first try.
- Upload: use automatic signing plus the API key from step 1. You do not need to manually create a distribution certificate — nearly every tutorial says you do. My measurement: this machine holds zero distribution certificates, and all eight apps made it to TestFlight. The certificate is managed in Apple's cloud — requested and used automatically, none ever landing on your machine.
- Add testers: add their email to the internal test list in the back office, or generate a public link and send it.
How to know it worked: two traces, both required — the build's status in the back office turns "available," and TestFlight on your own phone actually installs it.
The trap: the words "upload succeeded" count for nothing — they prove the bytes left your machine, not that Apple accepted and processed them. I hit an even nastier one: upload succeeded, processing done, every status green — but the build was never attached to a version. The back-office gallery showed a gray empty icon. Not one step reported an error; only eyes could catch it.
Finally, the whole chain's don't-trust / go-look pairs in one table. This table is the article's acceptance checklist:
| Step | Don't trust | Go look at |
|---|---|---|
| 0 Decide | The "an app would be convenient" instinct | Naming which of the four reasons it hits |
| 1 Register | The page saying "Pending" | The approval email |
| 2 First app | "It compiled" | Seeing that screen in the simulator |
| 3 Real phone | The launch command's "success" | Opening it on the phone, two levels deep |
| 4 Data (write-back) | All-green local tests | Largest payload, real phone → real server |
| 5 TestFlight | "Upload succeeded" | Status "available" + installed on your own phone |
Every link in this chain tends to half-succeed quietly, so acceptance at every step is never "no error" — it's finding, with your own hands, the trace that step should have left. Get that right, and writing code really is the easiest part: from zero, two weeks, nine apps. Enough.
RELATED
FOLLOW
New posts land here first. Subscribe via RSS: /feed.xml
AUTHOR
Tianli Zeng
Hydraulic engineer. I write about AI methodology and engineering practice.